We already talked about Procreate and e.g. how to master its brushes as well as seven tips and tricks of this amazing program you should keep in mind.
In this article we want to explore how to add paper texture in Procreate. One of the most effective ways to add texture to your digital artwork is by using paper textures. In this tutorial, we'll show you how to use paper textures in Procreate to create unique and interesting designs.

Learn Procreate for Beginners
FREE CLASS with everything you need to know
about Procreate for digital painting.
1. Choose a Paper Texture
The first step is to choose a paper texture that suits your artwork. You can find a variety of paper textures in purchased products for example, or you can create your own by taking a photo of real paper or scanning it.
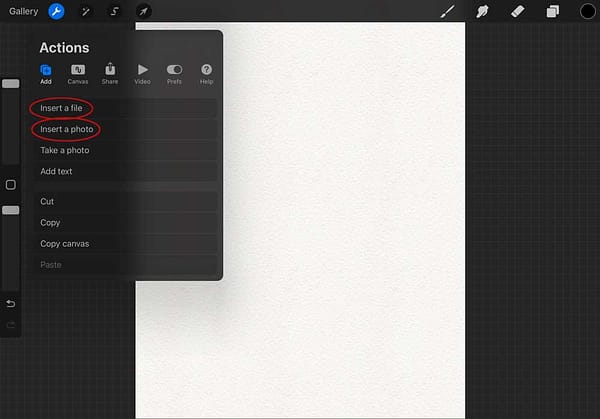
If you decide to take a photo, scan it or download it from the Internet you most probably have it as a JPG file in your Camera Roll. If so import it into Procreate by selecting the "Insert" icon and then "Insert a Photo."
I purchased my texture set with the "Aqua Real Set" from Lisa Glanz. I store the textures in my iCloud Drive so I choose "Insert a File" and pick the paper texture from a folder in the iCloud Drive.

2. Create a new Layer
If you have a JPG file you need to create a new layer after importing the paper texture. Make sure the new layer is positioned above the background layer with the texture.
3. Apply the Paper Texture
With the new layer selected and something drawn on it, tap the "Adjustments" icon and select "Hue, Saturation, and Brightness." Use the sliders to adjust the saturation and brightness of the paper texture to your liking. You can also try experimenting with the "Curves" or "Color Balance" adjustments to achieve different effects.

4. Erase Unwanted Areas
If there are areas of the paper texture that you don't want to show in your artwork, use the eraser tool to remove them. You can also use the layer mask feature to erase areas without permanently deleting them.
5. Blend the Layers
To blend the paper texture layer with the underlying layers, select the "Blend Modes" icon and experiment with different blending modes. You can also adjust the opacity of the paper texture layer to achieve the desired effect.

6. Add more Layers
If you want to add more paper textures or elements to your artwork, create new layers and repeat the above steps. You can also try experimenting with different blending modes and opacity levels to create interesting effects.
Conclusion
Using paper textures in Procreate is a simple and effective way to add texture and depth to your digital artwork. By following the above steps, you can easily import, adjust, and blend paper textures with your artwork to create unique and interesting designs. So, start experimenting with different paper textures and unleash your creativity!
Not familiar with Procreate yet? Get a free class!

Learn Procreate for Beginners
FREE CLASS with everything you need to know
about Procreate for digital painting.
